Who doesn’t love FUDGE!!!! There’s something wonderful about this creamy sweet treat. I remember a little fudge store that was in the mall we went to when I was a kid. It was the quaintest little confectionary shop, with the walls lined with handmade chocolates and fudges. Every flavor you could imagine. My favorite was the orange cream. The shop is long gone but the memories of that fudge live on.
I’ve had many different homemade fudges over the years and they have never lived up to that creamy fudge in my mind. That was until I found this recipe.
This is a fairly involved process but it will make you feel like you belong in your own version of Charlie and The Chocolate Factory! I always make sure I give myself plenty of time to make it. The hands-on time is limited but you need to constantly be keeping an eye on it.
The best part of this recipe, well other than the rich, sweet, creamy delicacy that this fudge is, is that you have to burn a few calories doing it and get a bit of an upper arm work out to boot. It’s important when you are stirring to get as much air in contact with it as possible so lifting and folding works better than stirring. And make sure you have a spare wooden spoon on hand, we actually managed to break 3 spoons one night making this.
It’s very important that you calibrate your thermometer. Test your thermometer by putting it in a pan of boiling water or I will boil the kettle and pour the water into a measuring jar and test it that way. If it doesn’t read 212 degrees Fahrenheit then adjust the recipe temperatures accordingly.
Don’t skip the stage when it says to wash down the side with a wet pastry brush. There is real science behind this. The difference between a creamy consistency and grainy one can be one little-undissolved sugar crystal. So wash those sides down!!!!
And finally the ultimate cheat moment. If you do this in the evening and leave it overnight in the fridge to set you are absolutely responsible for sampling the fudge first thing in the morning with your coffee. This is not ruining your breakfast but your duty to great fudge to make sure you have a perfect fudge. Take this responsibility very seriously and enjoy every bite!!!!
I hope you enjoy the recipe and this delicious treat.
Happy Home Cooking!!!
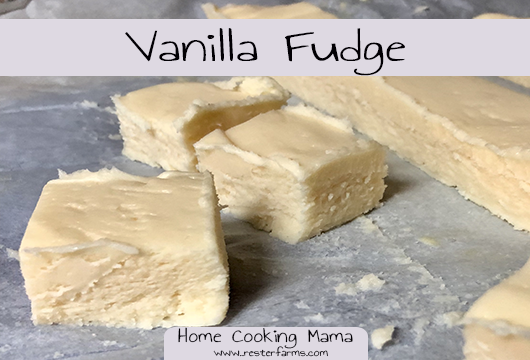
Homemade Vanilla Fudge
Ingredients
- 1.5 cups Heavy Cream
- 3 cups Sugar
- 1/4 tsp salt
- 1/4 cup light corn syrup
Instructions
Prepare Ahead Steps
- Baking Pan Prep: Take an 8" baking pan and butter it, then line it with parchment paper. You will want to make the parchment paper larger than the pan and let it hang over the edges by about 1 inch. Make sure to butter the parchment paper too.
- Thermometer Prep: Don't skip this step!!!! You need to calibrate your candy thermometer. To do so, place it in a jar of boiling water, it should read 212 degrees Fahrenheit. If it doesn't adjust all the recipe temperatures accordingly.
- Mixing Bowl Prep: Place a large bowl over a wire rack and place the tablespoon of butter in it. Keep it close by but out of the way.
- Additional Prep: You will want to have a pastry brush handy
Directions
- In a large heavy saucepan add the cream, sugar, corn syrup, and salt.
- Turn on the stove to medium-low heat and stir constantly until the sugar is dissolved. It should take around 10 minutes.
- Take your wet pastry brush and wash down the sides of the pan to prevent sugar crystals from forming.
- Increase the stove to medium heat and bring the mixture to a boil. Continue washing down the sides while it boils.
- Add the thermometer to the pan and let the mixture continue to cook, without stirring, until it reaches the soft-ball stage, 238 degrees Fahrenheit. Approximately 10 minutes but go by the thermometer, not time.
- When it reaches this stage quickly pour the mixture into the bowl with the butter. It is very important you DON'T scrape the bottom of the pan.
- Move the thermometer to the bowl and let the mixture sit, without stirring, until the thermometer registers 110 degrees Fahrenheit. Depending on temperature this can take anywhere from 1 1/2 hours to 2 1/2 hours. Patience!
- At this point remove the thermometer and with a wooden spoon fold the mixture until it thickens, turns a lighter color and loses its sheen. It's about 15 minutes.
- Pour the mixture into the square pan and spread it out evenly.
- Place the fudge in the fridge for 8 - 12 hours, overnight is ideal.
- Cut the fudge into 1-inch squares. Store in the refrigerator for up to a week.

Recent Comments